From the archive Nov 2013
Transparency in SceneJS
An original article from the xeolabs archive. Examples and external tools reflect the time of writing.
In this tutorial I'll show you how to
- make objects transparent,
- switch transparency on and off
- vary the opacity of transparent objects
- pick through transparent objects, to pick objects behind them
- depth-sort transparent objects for correct alpha-blending order
When you've read this tutorial, you might be interested to read about texturing your transparency with Alpha Maps.
#Making objects transparent
As usual, we'll point SceneJS at where you keep your plugins:
SceneJS.setConfigs({
     pluginPath:"./plugins"
});
Then we'll create the scene below, in which the outer blue box has a transparent material which allows you to see the teapot within it.
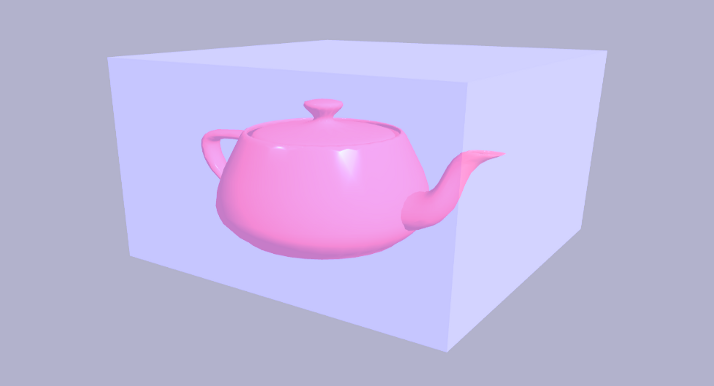
The code for this example is shown below. Our outer blue box is wrapped with a flags node, which works in conjunction with
a material node to make it transparent.
var scene = SceneJS.createScene({
    nodes:[

        // Set up a nice camera angle
        {
            type:"lookAt",
            eye:{ x:7, y:5, z:10 }, look:{ x:0, y:1, z:0 },

            nodes:[

                // Opaque red teapot
                {
                    type:"material",
                    color:{ r:1.0, g:0.3, b:0.3 },

                    nodes:[
                        {
                            type:"geometry/teapot"
                        }
                    ]
                }                     ,

                // Transparent blue box

                // Flags node enables transparency for our box.
                // This enables the material `alpha` to specify
                // the degree of opacity.
                {
                    type:"flags",
                    flags:{ transparent:true },

                    nodes:[

                        // Material node's 'alpha' property makes
                        // teapot 60% transparent.
                        {
                            type:"material",
                            color:{ r:0.3, g:0.3, b:1.0 },
                            alpha:0.4,

                            nodes:[
                                {
                                    type:"translate", x:1, y:2, z:1,
                                    nodes:[
                                        {
                                            type:"geometry/box",
                                            xSize:3, ySize:2, zSize:3
                                        }
                                    ]
                                }
                            ]
                        }
                    ]
                }
            ]
        }
    ]
});
Things to note:
- The
transparentflag on theflagsnode around the outer blue box which enables it to be transparent. - The
materialnode around the blue box has analphaof0.4, which works in conjuction with theflagsnode to make the box 60% transparent. - The box would be invisible if
alphawas 0.0, and opaque ifalphawas 1.0.
SceneJS automatically ensures that all transparent objects are rendered after opaque objects. If the transparent box was rendered before the teapot, then the teapot would not be visible because its fragments would have been rejected by the WebGL depth test because the pixels for the box would already be in the depth buffer, with closer depth values. Graphics geeks will note that there may be a problem with depth buffer rejection if we have multiple transparent objects. I'll address that in the following section on Transparency Sorting.
When designing SceneJS, I had considered just making the transparent property on flags nodes true by default.
That way, an alpha value less than 1.0 would be sufficient to make the box transparent, no flags node required. However,
that doesn't quite fit with alpha mapping (see tutorial on Alpha Maps). We might have an alpha of 1.0, then
have an alpha map that modifies it for fragments within the shader, which fails to create transparency for those because SceneJS has already
determined that the geometry is opaque. That's one reason we have flags in the mix, other being that we can use them
to easily switch transparency on and off for chunks of our scenes.
Switching transparency on and off
You can make the box opaque by flipping the transparent flag on that flags node:
myScene.getNode("myFlags",
    function(flags) {
        flags.setTransparent(false);
    });
Varying opacity
You can make the box less transparent my increasing the alpha on its material node:
myScene.getNode("myMaterial",
    function(myMaterial) {
        myMaterial.setAlpha(0.8);
    });
Picking through transparent objects
Want to be able to pick the teapot through the box? That's covered in the tutorial on Picking in SceneJS.
Transparency sorting
It's tricky making multiple overlapping transparent objects look good in WebGL. In this section I'll describe the problem, some solutions that don't work so well with WebGL, and a partial solution that SceneJS provides using prioritised render bins.
The problem
SceneJS renders transparent objects using the standard alpha blending technique, where it combines each transparent object's translucent colour with the colours of the objects behind it.
As mentioned earlier, there's one catch: SceneJS may also be using the depth buffer's Z-test to solve visibility for overlapping objects, which works by ensuring that each pixel is written to the colour buffer only if its Z-depth is closer than any pixel already at the same location.
The example below shows the problem. If we were to render the outer green box first, then when we try to render the inner yellow and blue boxes, the pixels of those boxes will not be rendered, because their Z-depths are greater than the pixels already rendered for the outer green box.
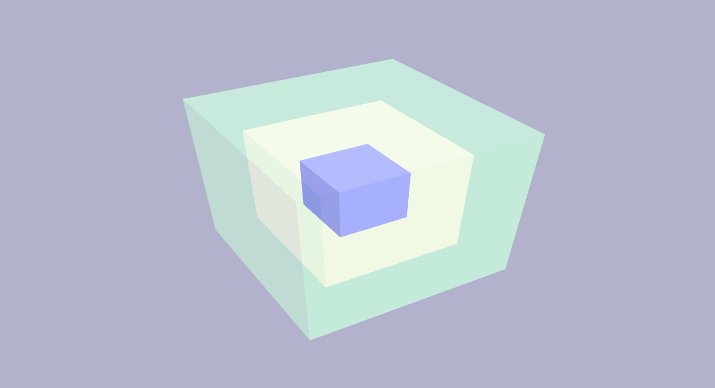
We therefore need to order the rendering of the boxes from the innermost box outwards, so that the pixels of each box don't get rejected by the depth test, and thus get the chance to be blended with each other in the colour buffer - a technique called transparency sorting.
Solutions that don't work so well in WebGL
Algorithms to find that order automatically are simple enough, but not easy to do efficiently on WebGL.
Painter's Algorithm or BSP? Nope.
Ideally, I would have liked to use the painters algorithm, or a BSP tree, which would render all the faces in the scene in order from furthest face first, through to closest face last.
Two show stoppers exist with that though:
- In WebGL we don't get that kind of granular access to individual faces. Rendering the faces of a mesh is a batch operation, where we bind the vertex arrays for the mesh, then do a draw call to render them in one hit.
- If we were able to draw each face individually (like we could back in the days of fixed-function OpenGL), then the constant switching of colours and textures for each face would make for some horrendously inefficient GPU state changes.
Depth peeling? Nope.
I had also considered depth peeling, which is essentially an order-independent
technique in which you render the scene multiple times, each time clipping the objects to a min-max layer, which you
move forwards each time. Even though that's awesome for solving our problem for nested objects, like our boxes, it requires multiple
passes on the draw list for each frame. That would severely impact SceneJS' efficiency at rendering large quantities
of objects, which is a priority feature.
Solution: Ordered render bins
In the end I went for the lowest common denominator and simply allowed you to organise scene objects within layer nodes.
These work by manually partitioning the objects into prioritised render bins, ordered so that the objects within the
layer with the lowest priority are rendered first.
Note that since the layer node's priorities can be
dynamically reassigned, the way is also open to support some sort of automatic object Z-sorting later if needed.
Let's have a look at how we use the layer nodes to render our boxes in the correct order for transparency.
Here's the scene that renders the nested boxes in the scene above.
var scene = SceneJS.createScene({
    nodes:[

        // Mouse-orbited camera
        {
            type:"cameras/orbit", yaw:30, pitch:-30, zoom:42, zoomSensitivity:5,

            nodes:[

                // Inner opaque blue box.

                // Rendered first, within layer at priority -1.

                // Box is opaque because material has default alpha of 1.0, and box
                // is not wrapped with a flags node with a 'transparent' flag set.

                {
                    type:"layer",
                    priority:-1,

                    nodes:[
                        {
                            type:"material", color:{ r:0.2, g:0.2, b:1.0 },
                            nodes:[
                                {
                                    type:"scale", x:3, y:3, z:3,
                                    nodes:[

                                        // Box primitive
                                        {
                                            type:"geometry/box"
                                        }
                                    ]
                                }
                            ]
                        }
                    ]
                },


                // Flags around our transparent boxes

                // Enables to 'alpha' values on the materials around
                // our boxes to to cause them to be translucent.

                // Also cull backfaces on those boxes because we can't
                // control the order in which faces render. We don't want
                // front faces rendering before back faces, which would
                // cause the back faces to be rejected by the depth buffer
                // and deny the opportunity
                // to blend the faces - easy fix is just to not render the backfaces.

                {
                    type:"flags",
                    flags:{ transparent:true, backfaces:false },

                    nodes:[

                        // Middle transparent red box

                        // Rendered next, in implicit layer at priority 0

                        // We don't actually need this layer because anything
                        // not within a Anything not in a layer is actually
                        // at priority 0 implicitly.

                        // This box is transparent because its wrapped with a
                        // material having an alpha channel that's less than
                        // 1.0, which works with the 'transparent' flag.

                        {
                            type:"layer",
                            priority:0,

                            nodes:[
                                {
                                    type:"material",
                                    color:{ r:1.0, g:0.2, b:0.2 },
                                    alpha:0.2,

                                    nodes:[
                                        {
                                            type:"scale", x:6, y:6, z:6,

                                            nodes:[
                                                {
                                                    type:"geometry/box"
                                                }
                                            ]
                                        }
                                    ]
                                }
                            ]
                        },

                        // Outer transparent green cube

                        // Rendered last, within layer with priority 1

                        // This box is also transparent because its wrapped
                        // with a material having an alpha channel that's
                        // less than 1.0, which works with the
                        // 'transparent' flag.

                        {
                            type:"layer",
                            priority:1,
                            id: "greenBoxLayer",

                            nodes:[
                                {
                                    type:"material",
                                    color:{ r:0.2, g:1.0, b:0.2 },
                                    alpha:0.2,

                                    nodes:[
                                        {
                                            type:"scale", x:9, y:9, z:9,

                                            nodes:[
                                                {
                                                    type:"geometry/box"
                                                }
                                            ]
                                        }
                                    ]
                                }
                            ]
                        }
                    ]
                }
            ]
        }
    ]
});
Things to note:
- The boxes are wrapped with
layernodes, withpriorityproperties set to order their rendering so that the innermost box renders first - Anything not within a
layernode is implicitly at priority 0. Thelayeraround the middle box is therefore actually redundant.
Changing layer priorities
You can change the priority on the layer nodes at any time. Let's change the priority for the green box:
myScene.getNode("greenBoxLayer",
    function(layer) {
        layer.setPriority(-2);
    });
That's going to make the green outermost box render before the innermost blue box, which is actually going to wreck our transparency sorting.
Performance tip: changing those priorities causes SceneJS to re-sort its internal display list, so there will be a performance hit if you do that frequently.
Conclusion
In this tutorial I've shown you how to use the material node in conjunction with flags nodes to make geometry
appear transparent. I also touched on the classic problem of making multiple overlapping transparent objects look good,
and described the partial solutuion provided by SceneJS through its layer nodes, which order the rendering of geometries
so that they alpha-blend nicely with one another.
What's next?
- Learn how to texture your transparency using Alpha Maps
